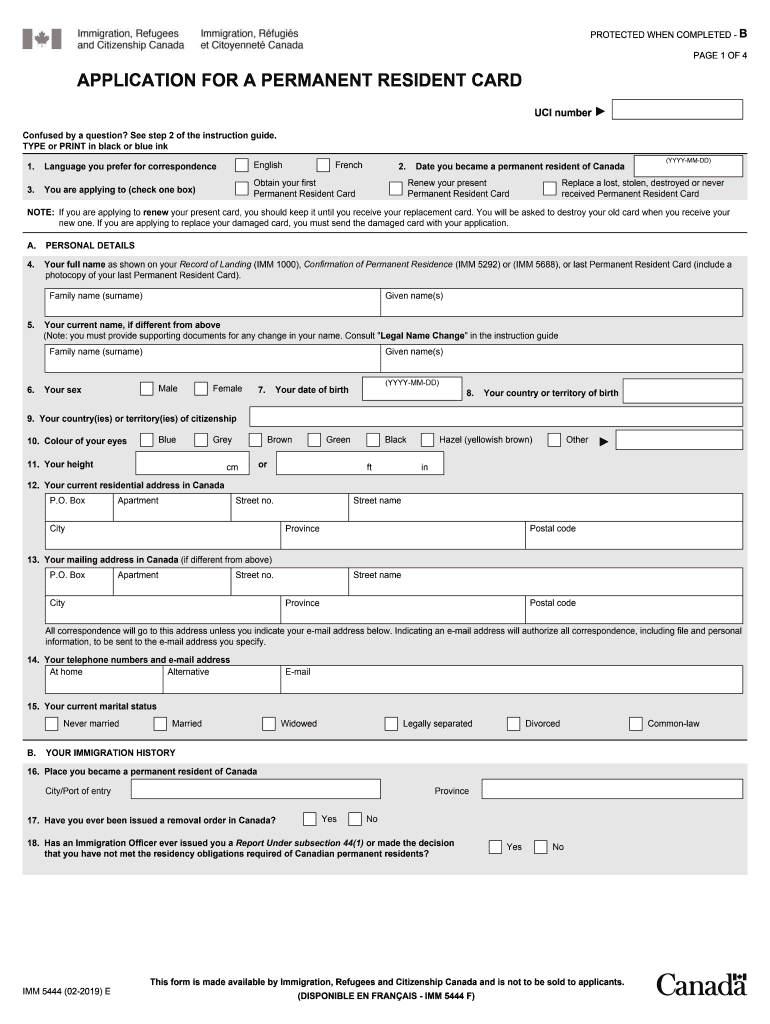
Imm 5444 2016


What is the Imm 5444
The Imm 5444e form, also known as the application for permanent resident card, is a crucial document for individuals seeking to establish permanent residency in Canada. This form is part of the immigration process and is specifically designed for applicants who wish to obtain or renew their permanent resident card. It is essential to understand the purpose of this form to ensure that all necessary information is accurately provided, which can significantly impact the outcome of the application.
Steps to complete the Imm 5444
Completing the Imm 5444e form involves several key steps to ensure accuracy and compliance. Start by gathering all necessary documents, including proof of residency and identification. Next, carefully fill out the form, ensuring that all required fields are completed. Double-check the information for accuracy to avoid delays. Once the form is filled out, sign it electronically if using a digital platform, or print it for manual signing. Finally, submit the form through the appropriate channels, either online or by mail, depending on the instructions provided.
Legal use of the Imm 5444
The Imm 5444e form must be used in accordance with Canadian immigration laws. It is important for applicants to provide truthful and accurate information, as submitting false information can lead to serious legal consequences, including denial of the application or even criminal charges. Understanding the legal implications of the form helps ensure that applicants remain compliant with immigration regulations throughout the application process.
Required Documents
When submitting the Imm 5444e form, applicants must include several supporting documents. These typically include a copy of the current permanent resident card, proof of residency in Canada, and identification documents such as a passport or driver's license. Additional documents may be required based on individual circumstances, so it is advisable to review the specific requirements outlined for the application process.
Form Submission Methods
The Imm 5444e form can be submitted through various methods, depending on the applicant's preference and the guidelines provided by immigration authorities. Options typically include online submission via a secure portal, mailing a printed version of the form, or delivering it in person to the appropriate immigration office. Each method has its own set of instructions, so it is important to follow the specified guidelines to ensure successful submission.
Eligibility Criteria
To complete the Imm 5444e form successfully, applicants must meet specific eligibility criteria. Generally, this includes being a permanent resident of Canada and meeting residency obligations. Applicants should be prepared to demonstrate their compliance with these obligations through documentation. Understanding the eligibility requirements is crucial for ensuring that the application is accepted without issues.
Quick guide on how to complete
A concise manual on how to prepare your Imm 5444
Locating the appropriate template can turn into a difficulty when you need to provide formal global documentation. Even if you possess the necessary form, it might be inconvenient to swiftly prepare it in accordance with all the specifications if you rely on paper versions instead of handling everything digitally. airSlate SignNow is the online electronic signature tool that assists you in overcoming these obstacles. It enables you to obtain your Imm 5444 and promptly complete and sign it on-site without needing to reprint documents whenever you make an error.
Here are the actions you need to take to prepare your Imm 5444 with airSlate SignNow:
- Click the Get Form button to instantly import your document to our editor.
- Begin with the first blank field, enter your information, and proceed with the Next tool.
- Complete the empty fields using the Cross and Check tools from the toolbar above.
- Choose the Highlight or Line options to emphasize the most crucial information.
- Click on Image and upload one if your Imm 5444 necessitates it.
- Utilize the right pane to add more sections for you or others to complete if needed.
- Review your responses and approve the document by clicking Date, Initials, and Sign.
- Sketch, type, upload your eSignature, or capture it with a camera or QR code.
- Conclude editing the document by clicking the Done button and selecting your file-sharing preferences.
Once your Imm 5444 is ready, you can share it however you prefer - send it to your recipients via email, SMS, fax, or even print it directly from the editor. You can also securely store all your completed documents in your account, organized in folders based on your preferences. Don’t spend time on manual form completion; give airSlate SignNow a try!
Create this form in 5 minutes or less
Find and fill out the correct
FAQs
-
What is the step-by-step procedure to apply for Canada PR?
After having lived through the horror of my own immigration process, and seeing countless other people making the same mistake, I thought its better to lay out the most effective, easy to understand and follow, approach to Canadian immigration.Some basic info on Canadian ImmigrationFor all immigration purposes, the Canadian Govt. has developed a really good website that you’ll need at every step of the application here on - Immigrate to Canada. Thanks to this website, you don’t need an attorney or consultant.Canada offers multiple channels for immigration, that you can make use of:Express Entry: Most popular and fastest immigration route, run by the Federal govt.. Meant for skilled people. Manages three economic immigration programs:Federal Skilled Worker Program (FSW) - Skilled workers with foreign experience. All professionals in sales, marketing, IT, finance, legal, medicine, etc. fall under this category.Federal Skilled Trades Program (FST) - People qualified in a skilled trade with foreign experience. Chefs, bakers, equipment operators, etc. fall under this category.Canadian Experience Class (CEC) - Skilled workers who have Canadian work experience.Provincial Nominee: Second most popular channel. Meant for people who do not have sufficient score to clear Express Entry. Run by each individual province. Program opens on ad-hoc basis. If you get nominated, then you must spend 2 years in the province, before you can move to any other province.Family Sponsorship: Existing permanent residents can sponsor their relatives, including their spouse, partner, children, parents, grandparents, and others to immigrateQuebec-selected skilled worker: Immigration program run separately by the province of Quebec. Meant for people who want to live in Quebec specifically.Start-up Visa: Have a start-up idea and can bring in local jobs? Canada will give you a PR, if your idea is accepted by a designated organization and implemented.Self-Employed: Can contribute culturally or in athletics to Canada.Atlantic Immigration Pilot: Immigrate by graduating from a school or working in New Brunswick, Prince Edward Island, Nova Scotia, or Newfoundland and Labrador. This program is meant to boost the economies of Atlantic provinces that usually don’t see much immigration influx.RefugeesMajority of the applicants apply via Express Entry, Provincial Nomination or Family Sponsorship. For this answer, I’ll focus exclusively on Federal Skilled Worker Program.Canadian immigration is entirely points based. Every applicant is awarded fixed points for their education, age, language abilities, marital status, spouse’s qualifications, etc. The system that awards these points is called the Comprehensive Ranking System (CRS).Every month, the Canadian Immigration Agency - IRCC, announces a cut-off score. All applicants with CRS score above this cut-off receive an invitation to apply for permanent residence. The ones that don’t qualify remain in the pool.STEP-BY-STEP PROCEDURE TO APPLY FOR CANADIAN PRSTEP 1: Check your eligibility (Cost: Free, Time: 10 mins)Use this quick online tool from the Canadian Govt. to check if you are eligible to apply. Do you want to come to Canada, or extend your stay? Scoring Criteria >> Eligibility to apply as a Federal Skilled Worker (Express Entry).STEP 2: Gauge your chances early (Cost: Free, Time: 15 mins - 2 hours)If you are eligible to apply, then I strongly recommend you to check your CRS score with your info and hypothetical scores for IELTS >> Comprehensive Ranking System (CRS) tool: skilled immigrants (Express Entry). At this stage, there are some important factors that will adversely affect your application:IELTS score: You need to score at least 8–7–7–7 (Listening, reading, writing, speaking respectively), to sufficient points to compete in the pool. Anything less than this, will cost you tonnes of points.Education: If you have a Bachelor/Masters, do some background research to check if World Education Services (WES), the authority that will assess your educational qualifications, will consider your university degree equivalent to a Canadian Bachelors/Masters. Reason why I say this is because if you have a Masters from a tier 3 college, and if WES does not find it equivalent to a Canadian degree, then you will end up being recognized as an applicant with only a Bachelors degree, losing crucial points in the process. Doing this check at this stage will save you a lot of money and trouble.Age: Every year beyond the age of 30, applicants will lose 5 points. So if you are planning to apply at a later date, then be sure to keep this mind.Work Experience: While claiming for work experience, note that Canada assumes that you have always worked in the same job classification, as denoted by your NOC code. If you were a Marketer for 3 years, and an Interior Designer for 2 years, then you cannot claim a combined work experience of 5 years. Choose whichever experience you want to claim, and stick with that corresponding NOC throughout your application.Spouse: It is not mandatory to have your spouse take the IELTS and verify their educational credentials. But if your CRS calculator shows you with points in the range of 400–430, then consider entering hypothetical IELTS scores for your spouse, and also entering their educational credentials.Try multiple permutations and combinations of the above factors in the CRS tool before you even begin your PR journey. Now, go through the CRS draws announced in the past few months with this link >> Express Entry rounds of invitations. This will help you get an idea about where you currently stand.For e.g., for this entire year, the draws have always been around 440–445. So look for a hypothetical CRS configuration that will help you score more than this cut-off.Everyone with a CRS score of 400+ should proceed to the next step. Others who aren’t scoring as much, should do a little bit more research and consider alternative immigration methods.Protip: I suggest taking a free mock IELTS test to actually check how much you score. Your entire application may rest on the laurels of your language abilities, so I would give particular attention to this.Another ProTip: If your spouse is younger than you, or has higher educational credentials, then please let them be the primary applicant instead.STEP 3: Educational Credentials Assessment (Cost: INR 20,000 per person, Time: 30–45 days)Dipak has an excellent step-by-step process on how to do this >> Dipak Maheshwari's answer to What is the process to get Educational Credential Assessment (ECA) for Canada PR from WES? This assessment will take you approximately one month, so get started at the earliest. Some things to keep in mind:I chose the express shipment via UPS at CAD 85 to receive the document. People who have chosen the cheapest delivery option have had mixed results. So take your chances.I also chose to have my university send the transcripts and degree certificates directly to WES, with the reference number mentioned. Works flawlessly, saves time.STEP 4: Take the “IELTS General Training” test (Cost: INR 11,500 pp, Time: depends on test date availability)While you initiate the WES ECA process, also start looking for available IELTS test dates in your city. Considering the heavy demand for IELTS for both immigration and education, test dates are at least 20 days away in many cities around the world. Having said that, I strongly suggest that you take a test date that’s at least 30 days away to give you ample time to prepare for the test.ProTip: Some tips to score well on your IELTS examSTEP 5: Start saving money in your bank account as Proof of FundsAs part of the PR process, Canadian immigration rules require you to have sufficient funds to manage your living expenses when you first arrive. Through the PR process, applicants need to prove that they have the necessary funds in their bank account. For more details on the amount, type of funds, etc >> Proof of funds - Skilled immigrants (Express Entry)In case you don’t have the sufficient funds, consider saving the required funds in your bank account at the same time you decide to apply for PR. Its best to show a gradual accumulation of funds in your account, rather than sudden, bulk transfers.ProTip: If you have a salary account, maintain the account balance with every monthly salary credit. Use your spouse’s income for other expenses.STEP 6: Create your Express Entry profile (Cost: Free, Time: 1 hour)After you have received your ECA and IELTS reports, go ahead and create an express entry profile. IRCC has a fantastic and easy to understand guide on creating your Express Entry profile. Submit an Express Entry profile: Online form. Submit your application. You’ll receive a confirmation via email, and within the application inbox inside the CIC portal. You’ll also receive the CRS score that the system has given you, and will be placed in the Express Entry pool.From here on, keep a close eye on the draws announced by IRCC. If your CRS score clears the cut-off, then you will receive an Invitation to Apply within 24–48 hours, via email.In case the cut-off appears to be far beyond your signNow, and if you feel there is nothing more you can do to add more points to your profile, then consider applying for Provincial Nomination Programs instead. Am not an expert in PNP process, but you can seek help through a legion of fellow applicants over at CanadaVisa forums >> Provincial Nomination Program ImmigrationSTEP 7: Post-ITA Documentation (Cost: INR 10,000 pp, Time: 60 days)Congratulations on receiving your ITA! You have now successfully completed the major hurdle of your immigration journey. All that is left now is to provide the documentation expected of you within the time limit, and if everything is in order, you’ll receive your PR confirmation.The documents you will need to prepare at this stage are:Medical Exam at a IRCC authorized center. (INR 8500 per person in metros)Police Clearance Certificate from Passport Seva Kendra (INR 500 per person) >> (How to get a PCC)If you have lived in a foreign country for more than 5 months cumulatively, then you will have to procure a police clearance from those authorities. This can take a while, so get started on this first. (Note: IRCC says 6 months, but I have seen people with 5 months of stay also being asked for PCC)Reference letter from employer. (More Details)Bank Statement & Digital PhotosSTEP 8: Application Submission and PPR (Cost: INR 50,000 pp, Time: None)After having prepared the documents, you need to submit these in the system and make the final payments.INR 26,250 - Application Processing fee: CAD 550 per personINR 23,400 - Right of Permanent Residence Fee (RPRF): CAD 490 per person ~ (Note: this can also be paid when you are landing in Canada)INR 7160 - Dependent Child: CAD 150 per childIf you have successfully paid your fees and submitted the application, you’ll receive an Acknowledgment of Receipt (AoR) via email and within the application inbox.From here on, all you need to do is wait for an email from IRCC requesting your passport. Among the immigration community, this is called PPR - passport request. At this stage, you can be 99% sure that your PR has been confirmed. Once you receive this email, you visit the nearest VFS Global center, submit your passport and photos, and await for the final visa stamping.ProTip: Paying your RPRF will reduce the processing time by 4–7 days.STEP 9: Pre-arrival and landingAlthough you have received the PR confirmation in Step 8, the process is not yet officially concluded. One year from the date of your medicals, your immigration visa will expire. Within this time, you and your dependents must enter Canada by Flight or car at the border crossing, and complete the formalities. >> Sandeep's answer to What are the first steps after signNowing Canada?ProTip: Signup with settlement agencies like SOPA or PlanningForCanada that will help you with orientation and other useful information. Also plan to land 3 months after receiving your PR.This concludes the step-by-step process for obtaining a Canadian PR. All the best, folks!P.S. Veteran immigrants, please feel free to correct or enrich this answer based on your experience.Follow our story on our blog LockStockCanada.com
-
As a permanent resident, if I am out of country for more than 5 years in Canada, is my residency dead?
This question and the answers below manage to disprove the properly held belief that the Canadian Immigration Website is the single sole source of complete accurate information on all issues relating to Canadian immigration and citizenship. This plays into the government pushed storyline that proper expert advice is not necessary and therefore a waste of time and money.Let me demonstrate how someone could easily be mislead by the Canadian government website into believing that they have lost their permanent residence status, because they are physically absent from Canada for extensive periods of time.A new permanent resident of Canada is issued a Permanent Resident Card soon after they assume Permanent Residence Status in Canada;A PR Card is the document that one uses to prove to Canadian port of entry officials when you are entering Canada using a commercial conveyance, that you possess the status of Permanent Resident of Canada. An equivalence can be drawn to Canadian Citizens proving their Canadian Citizenship to these same port of entry officials when entering Canada using a commercial conveyances by presenting a valid Canadian passport;PR Cards are issued for 5 year periods. In order to renew your PR card, one needs to indicate on the application that they have been physically present in Canada at least 2 out of the last 5 years before applying (Note: Let’s leave aside for a moment the tremendous amount of fraud on this point, as Canada does not have the means to enforce physical presence).If you are outside of Canada when your PR card expires, the government website then implies you have lost your PR status and then maps out a complicated process to prove why they should issue you a Permanent Resident Travel Document to seek re-entry;If your PR card expires that does NOT mean that you cease to be a PR of Canada. It means that you do not have a unexpired PR card to prove that status to Canadian port of entry officials when you are entering Canada using a commercial conveyance. An equivalence would be that the expiry of a Canadian passport does not mean that the person ceases to be a US citizen.However, If you dig deep enough into the government website, you will find this admission here:“You are still a permanent resident if your card expires.”and here: “If you live outside of Canada for longer, you may lose your permanent resident status.”Since you are still a PR of Canada, there is nothing that prevents you from attempting to enter Canada on a private conveyance (such as a car or boat from the US). You will either be allowed into Canada where you can spend the required time to be eligible to apply for a new PR Card which will allow future entry by commercial conveyance OR you will be identified at the port of entry as someone who MAY be found to have abandoned your permanent residence.In order for you to actually lose your PR status the following must occur:-You must be found by an Immigration Official to have been absent for extensive periods of time; and-The official must file an appropriate report; and-An adjudication must be heard that examines fully your situation pursuant to basic Canadian administrative law procedures;-A decision of abandonment must be made and all appeals exhaustedIf all of that happens then the “may lose” turns into a “have lost”. Since this is obviously resource intensive for the Canadian government with an uncertain outcome of lost pr status, a signNow effort is made to “convince” the pr to “abandon” their pr status.Like the mistaken assumption that one loses their pr status if their pr card expires, having someone abandon their status rather than go through extensive effort to legally remove that status is in the government (but not the pr’s) best interest.In short, the government by implying; burying required procedures ; and lack of clarity on this issue fills a government objective. Specifically to have long-time absent Permanent Residents either think they have lost their pr status or “convince” them to actually voluntarily relinquish their pr status. This is NOT in the interests of Permanent Residents who have spent considerable sums of money in government fees and other costs to acquire that permanent resident status.The belief that professional advisors are not required as the Canadian government website always gives you all the necessary legal guidance that you could possibly need is demonstrable incorrect. Such a belief is the equivalent to believing that the Canadian Tax Authority Website will show you ever possible legal tax avoidance option available to you.Yes these websites are free. However, as I just demonstrated, the advice they sometimes give is worth exactly what you paid for it….nothing.
-
In which country I can get citizenship easily?
There are some 14 citizenship by investment available in the world (as of 2019), below is a list of some that lead to citizenship quite easily:1. St Kitts and NevisSt Kitts and Nevis has the oldest citizenship by investment program in the Caribbean.It requires 150,000 USD one time contribution or 200,000 USD real estate investment to qualify citizenship.There are no residency requirements nor a visit required to get the Kittitian passport.There is 60 day fast track application process available with St Kitts and Nevis.As of 2019, St Kitts passport has visa free access to 151 countries in the world.2. DominicaDominica island in the Caribbean has a citizenship by investment program since 1993.It requires 100,000 USD (contribution) or 200,000 USD real estate investment to qualify for becoming a citizen of Dominica. Processing time is 6 months and there are no residence requirements nor any need to visit the country to get citizenship.As of 2019, Dominica passport has visa free access to 137 countries.3. Antigua and BarbudaAntigua and Barbuda requires 100,000 USD (contribution) or 400,000 USD (real estate investment) to become a Citizen.The limited time 50% discount will apply until Oct 2019.Initially there are no residence requirements to get the passport, but when you renew your passport after expiry in 5 years, you must have visited Antigua for 5 days in the previous 5 year period.There is also no requirement to visit the country for receiving citizenship or passport initially either.The passport processing time is 4 months. After first 5 year period, the renewed passport is valid for ten years.Antigua and Barbuda recently lost their visa waiver agreement with Canada, causing its passport to drop its value.As of 2019, Antigua and Barbuda passport has visa free travel to 150 countries.4. MaltaMalta, an EU country, has the official citizenship by investment program (Malta IIP) in Europe.The citizenship under investment is limited to 1800 applicants and may be extended further.Malta requires a 650,000 EUR contribution and some further investments in Malta to become a Maltese citizen.It takes about 15 months to get the Maltese passport. Malta passport issued under IIP is valid for 10 years.Maltese passport has visa free access to 182 countries.5. CyprusCyprus, which is part of the EU, has a citizenship by investment program, which signNowly changes on July 15th, 2019.Cyprus requires an initial donation of 75.000 EUR to the Cyprus Land Development Corporation and 75.000 EUR to the Research and Innovation Fund and 500,000 EUR investment in Real estate, Bonds or in Enterprise projects.You have to visit the country to receive citizenship and there is a new 6 month residency requirement (hold residence card) before applying for Cypriot passport.Application processing time is about 3 months and it takes around 8 months to get the Cyprus passport after the investment.As of 2019, Cyprus passport allows visa free travel to 173 countries.6. TurkeyTurkey launched a citizenship by investment program on January 12, 2017. In 2018, the investment prices got reduced. Foreign investors qualify for Turkish citizenship buying 250,000 USD worth of real estate in Turkey or 500,000 USD enterprise investment in Turkey or $500,000 worth of Government bonds.As of 2019, Turkish passport has visa free access to 111 countries globally.You can find extensive information on each of these programs here;Immigration by Investment Programs | The Get Golden Visa
-
What should I do if I have been out of Canada for 2 years after getting permanent residency? What would be the consequences when I apply for citizenship?
This question and the answers below manage to disprove the properly held belief that the Canadian Immigration Website (Immigration and citizenship) is the single sole source of complete accurate information on all issues relating to Canadian immigration and citizenship. This plays into the government pushed storyline that proper advice is not necessary and therefore a waste of time and money.Let me demonstrate how someone could easily be mislead by the Canadian government website into believing that they have lost their permanent residence status, because they are physically absent from Canada for extensive periods of time.A new permanent resident of Canada is issued a Permanent Resident Card soon after they assume Permanent Residence Status in Canada;A PR Card is the document that one uses to prove to Canadian port of entry officials when you are entering Canada using a commercial conveyance, that you possess the status of Permanent Resident of Canada. An equivalence can be drawn to Canadian Citizens proving their Canadian Citizenship to these same port of entry officials when entering Canada using a commercial conveyances by presenting a valid Canadian passport;PR Cards are issued for 5 year periods. In order to renew your PR card, one needs to indicate on the application that they have been physically present in Canada at least 2 out of the last 5 years before applying (Note: Let’s leave aside for a moment the tremendous amount of fraud on this point, as Canada does not have the means to enforce physical presence).If you are outside of Canada when your PR card expires, the government website then implies you have lost your PR status and then maps out a complicated process to prove why they should issue you a Permanent Resident Travel Document to seek re-entry (Permanent resident travel document);If your PR card expires that does NOT mean that you cease to be a PR of Canada. It means that you do not have a unexpired PR card to prove that status to Canadian port of entry officials when you are entering Canada using a commercial conveyance. An equivalence would be that the expiry of a Canadian passport does not mean that the person ceases to be a US citizen.However, If you dig deep enough into the government website, you will find this admission here:https://www.canada.ca/en/immigra... “You are still a permanent resident if your card expires.”and here: https://www.canada.ca/en/immigra... “If you live outside of Canada for longer, you may lose your permanent resident status.”Since you are still a PR of Canada, there is nothing that prevents you from attempting to enter Canada on a private conveyance (such as a car or boat from the US). You will either be allowed into Canada where you can spend the required time to be eligible to apply for a new PR Card which will allow future entry by commercial conveyance OR you will be identified at the port of entry as someone who MAY be found to have abandoned your permanent residence.In order for you to actually lose your PR status the following must occur:-You must be found by an Immigration Official to have been absent for extensive periods of time; and-The official must file an appropriate report; and-An adjudication must be heard that examines fully your situation pursuant to basic Canadian administrative law procedures;-A decision of abandonment must be made and all appeals exhaustedIf all of that happens then the “may lose” turns into a “have lost”. Since this is obviously resource intensive for the Canadian government with an uncertain outcome of lost pr status, a signNow effort is made to “convince” the pr to “abandon” their pr status.Like the mistaken assumption that one loses their pr status if their pr card expires, having someone abandon their status rather than go through extensive effort to legally remove that status is in the government (but not the pr’s) best interest.In short, the government by implying; burying required procedures ; and lack of clarity on this issue fills a government objective. Specifically to have long-time absent Permanent Residents either think they have lost their pr status or “convince” them to actually voluntarily relinquish their pr status. This is NOT in the interests of Permanent Residents who have spent considerable sums of money in government fees and other costs to acquire that permanent resident status.The belief that professional advisors are not required as the Canadian government website always gives you all the necessary legal guidance that you could possibly need is demonstrable incorrect. Such a belief is the equivalent to believing that the Canadian Tax Authority Website (Canada Revenue Agency) will show you ever possible legal tax avoidance option available to you.Yes these websites are free. However, as I just demonstrated, the advice they sometimes give is worth exactly what you paid for it….nothing.
-
How do I emigrate to Spain?
Having recently made the permanent move to Granada, Spain from the UK as an Irish and EU citizen, I can help with some of the surprises we came up against. Unfortunately, even for an EU citizen, it's not as easy as packing up and moving to Spain. Bear with me as I take you through the details:Acquiring NIE Certification. This is a certificate giving you a 'Foreigner's Identifying Number' for up to a 3 month period. Beyond 3 months, you are required to get a Resident Card. Get the NIE immediately - you need it for opening a bank account, to get a SIM (even prepay), for any online transaction, for receiving packages from the postman (I know), for signing a rental contract, for anything really. So as soon as you arrive in your desired location, before looking for flats, before exploring the city, go straight to your local Immigration Office and pick up the form EX-15 to apply for the NIE. (No, it's not available online and neither is any of this process which, amongst many other reasons, makes it very frustrating.) Official government page about this application.Along with picking up the EX-15 form, make sure you talk to someone in the office (our experience is that they only speak Spanish) and ask what is required for applying for the NIE. Don't trust what the internet says or even what I'm telling you here - you need to verify with them in that particular office and double-check, get them to write it down for you. Because next time you go back, they may say something else entirely and you can show them this piece of paper. (Still not guaranteed to work but it helps keep them accountable.) Before leaving the office, make sure to set an appointment for returning the completed form. They don't automatically do this and it's astonishing because they expect you to have an appointment when you return so make sure to ask for one. The appointments are generally one month in advance so this is why you need to go as early as possible. If you tell them you need the NIE urgently, they may let you back without an appointment if you beg but we arrived at 8am and didn't get seen until 1:30pm so be prepared to sit around.Now that you have the form, go to an internet cafe/locutorio and make at least one copy of it (so you can start on one and not make mistakes on the original). NOW MAKE COPIES OF EVERYTHING. Copy your passport at least 10x, your latest Pay Slips, your latest Bank Statement, etc. When filling out forms, scan every completed form back onto a USB Stick. CARRY A COPY OF EVERYTHING WITH YOU AT ALL TIMES. A copy of your passport, NIE Cert when you get it, your Resident Card when you get it; have it all with you - you'd be surprised how often you're asked for these documents. To apply for the NIE Cert we needed:Original passportCopy of passportCompleted EX-15 form - here's an English translation form but you'll need to submit the Spanish one they give you.Copy of completed EX-15 formThey also say they need some sort of 'communication' of the reason you need an NIE but this was just to open a bank account for us so we didn't have anything to show for it and that was fine. Submission Appointment: Upon returning to the office with the required forms on your appointed day and time, they take the forms for processing and you are asked to come back after 7 calendar days to pick up the NIE Certificate. No appointment necessary for this one, just show up when you can (morning preferable because you need the bank to be open).Pick-up Day (7-days later): When you return to pick up the NIE Cert, check in at the desk and they will give you a form to bring to the bank. You need to go to any bank (hopefully there's one close by that they can direct you to) and pay in cash for the NIE Cert and acquire a stamp of proof of payment, approx. €16. Bring this back to the office. Now you have your NIE Certificate!!! Write this number down immediately on your hand, tattoo it on your body, make it your phone background, you will need it for every transaction you do going forward for the next 3 months. Don't leave the Immigration Office just yet!! Before you leave, make sure to ask them what you need to apply for a Resident Card. Remember to double-check their response, get them to write it down, give you any forms you need and get that appointment too!Next, Acquiring Resident Card: This is the card you need if you plan to reside in Spain longer than 3 months (or beyond the expiry date of your NIE Cert). For this application, you should be in possession of a form and a document explaining what other documentation they'll require for your specific application. This changes according to your nationality and your purpose for residing in Spain. For us, as self-employed EU citizens, NOT registering our business in Spain, we each had to apply as an 'inactive person with sufficient resources and health insurance'. This means we filled out the EX-18 for EU citizens. (English translation version.)To apply for the Resident Card we needed:Original passport2 x copies of passport (form says 1 but they insist you have 2!)Completed EX-18 formCopy of EX-18 form (they actually didn't ask us for this in the end)Proof of sufficient resources* - for this we printed a bank statement for each person applyingProof of health insurance** - document from our health provider stating start date and cover details (ideally in Spanish) - print out ALL the documentation your Health Provider sends you as our cards weren't sufficient for some reason. They wanted to see all the conditions of the plan. Who cares about your privacy, right? *Proof of sufficient resources - nowhere in any documentation or from speaking with anyone in the Immigration Office is it clear what exactly constitutes 'sufficient' resources for your planned stay in Spain. We had indicated that we will be residing here for a year and we had saved money to do so, so showing a bank statement with that money in it was 'sufficient'. This easily covered rent for a year and what we calculated as our expected daily expenses although how that tallied with what the Immigration Office expected to see, I've no idea. [Update] I got a vague answer on this that they are looking for incoming deposits of only €5,500 annually. Even though we are not earning a salary at the moment, they insisted on seeing deposits coming into each of our bank accounts over the past 3 months. Thankfully we had this from previous employment but it's laughable as surely the current amount in the account is more important that the money I received months ago, have long ago spent and so no longer have! We actually ended up getting one of our applications rejected since we only submitted one bank account statement for both applications with (what we calculated as) sufficient funds for 2 people. The 2nd person's application was rejected since their name needs to be on the account or otherwise prove they are a dependent or married to the account owner. Since our marriage certificate (which I had with me anticipating this issue!) was in Italian and not an apostille or 'certified/notarised', they could not accept it. [Thankfully we dashed to a locutorio, printed out the last 3 months of bank statements under his name and since it also had some incoming deposits from a previous employment, we were allowed submit that on the spot instead of coming back for another dreaded appointment with another dreaded interviewer that would change the requirements yet again!]**Proof of health insurance - we made the mistake of not researching this one quite sufficiently. We assumed (after which I kick myself every time, in Spain you NEVER assume, you always check and double-check) that the European Health Insurance Card we received from paying our taxes in the UK for years would suffice as Health Insurance (as it does for visitors or students but not for those planning to stay for a year). We actually did ask the Immigration Office if this card was sufficient and they told us 'yes' but when it came to actually submitting the application, we were refused on these grounds and had to wait another month for another appointment. There is a public Health Insurance option in Spain but we can't take advantage of it until we have a Resident Card and have lived here for a year (and probably paid taxes for a year). So in the meantime, we acquired Private Health Insurance from SANITAS who clearly stated on their website that they could provide assistance and contracts in English, access to English-speaking medical staff and best of all, ensure that it was sufficient for the Residency Application. For two of us, we are paying approx. €80/month for a year contract. Submission Appointment: Upon returning to the office with the oh-so-many required (and many not!) forms on your appointed day and time, they take the forms for processing and give you another form to bring to the bank. You need to go to any bank and pay €10.80, getting a stamp as proof of payment. Bring this form directly back to the office. Now you have your Spanish Resident Card!! ...Oh boy is it so anticlimactic...it's not even plastic or laminated but a piece of green paper with a stamp and a start date. I'm quite sure I'm going to lose it before I even get home. And now the doubt sets in, after all that rigmarole and 7 separate visits to the Immigration Office, as I question why do I even need this thing again?!!Image: Supporting document to the EX-18 form. Shows you what supporting documentation is required according to your type of status in applying for a Resident Card.
-
What step-by-step process should I follow to file a Canadian PR application without any external help from a consultant?
Let me start this answer by saying ‘External Consultant is not at all required to apply for Canada PR under Express Entry (Federal Skilled Workers Programme or Provincial Nominee Programme)’.Following are the steps to apply for Canada PR via Express Entry Programme. Steps for PNP are not included below.Step 1:Identify whether you are eligible for Canada PR or not. This can be checked via a free Comprehensive Ranking System (CRS) Tool available on the official website of the Canada Immigration website.Here is the link - Eligibility to apply as a Federal Skilled Worker (Express Entry)Step 2:Once you find yourself eligible for Express Entry Programme, check your comprehensive score (CRS) at the following linkComprehensive Ranking System (CRS) tool: skilled immigrants (Express Entry)Minimum CLB 7 is required to be eligible for Canada PR. i.e for IELTS, 6 in each module and for CELPIP, 7 in each module is required.However, make sure to put 8777 (Listening, Reading, Writing, Speaking) score while checking your CRS. If you are selecting CELPIP, put 9 each. I will explain the reason to this in the answer later.If your score is 440 or above, assuming that you have entered authentic information in the CRS free tool, you have high chances to immigrate to Canada under Express Entry Programme.Step 3:You need to get your credential documents assessed by an authorised and listed organisation. Following is the list of those organisations. Identify which one suits you the best. WES is highly recommended.Comparative Education Service HomepageICASEvaluations for Immigration (ECA) - World Education ServicesIQAS assessment for immigration purposesInternational Credential Evaluation Service (ICES)Before you decide to take up IELTS/CELPIP/TEF, kindly initiate the process for Education Credential Assessment (ECA) as collecting documents for this process is time-consuming. You will need transcripts for all degree certificates from your universities.If your spouse possesses an undergraduate or postgraduate degree, it is advisable to get his/her credentials assessed. This will give you additional points in CRS and will increase your chances of getting an invite (ITA) for permanent residency.Step 4:Appear for any linguistic skills such as IELTS, CELPIP or TEF.Step 5:Once you have your linguistic test results and ECA result, create an Express Entry Profile. Keep your degree certificates and transcripts handy while creating your EE Profile as exact start and end date of the course will be required.Below is the link where you can initiate creating your EE Profile.Create an account or sign inGo to the bottom of the page where you will see ‘Continue to GCKey’. Select this option and ‘Sign Up’ with the required information. There is no cost involved to create an EE Profile.Note that without Linguistic Test Results and Educational Credential Assessment (ECA) results, Express Entry Profile cannot be created.Step 6:Once you have created and submitted your Express Entry Profile with a score of 440 or above, kindly initiate arranging required documents for the invite. Arranging certain documents will be cumbersome and time-consuming, hence it is advisable (highly recommended) to arrange the majority of them prior to receiving ITA.Following is the list of documents required;Passport/Travel DocumentLanguage Test ResultsECA ResultProvincial Nomination (If you have one)Reference Letters for current and past employmentPolice Clearance Certificate/s (for all those countries where you have stayed more than 6 months)Proof of Funds/Proof of Means of Financial SupportMarriage CertificateBirth Certificate of ChildEducational Documents (Diplomas/Degrees)Photographs (Digital)Legal Name Change/Difference Affidavit (If the name differs in documents)Medical Exam Proof (It is advisable to go for medicals after you receive the invite)Translation of Documents (if the document is in a language other than English)Translator’s Affidavit (Only if #14 mentioned above is applicable)For all the above-listed documents, the requirements are clearly mentioned on the following link;Applications for permanent residence programs subject to the Express Entry completeness checkStep 7:Scan all the above documents at a proper resolution (legible) to a laptop or desktop. Make sure the format of all documents is PDF with size less than 4MB.Digital photographs (35mm x 45mm) should be of JPEG/JPG format with an ideal size of 240 KB, but not less than 60 KB.Step 8:Once you receive the ITA, login to your Express Entry Profile and Accept the invitation. Upon acceptance, you will be able to see different tabs, where you have to provide detailed information of all applicants (including spouse and minor).Fill out all the forms with accuracy and authentic information. Make sure, you do not change any detail in the application which was provided earlier in Express Entry Profile. If required, take expert advice.Step 9:Get your medical examination done from a Panel Physician only. Check the below link about the list of Panel Physicians.Panel PhysiciansCall the hospital and take the appoint for medical examination. Medical of spouse and child/children is also required. Ask the hospital about documents required for medicals.You will have received a PDF in your EE Profile mailbox upon receiving the invite, which is a confirmation of your ITA. Take that print along with 3 passport copies (each applicant) to the hospital. You should also have a credit card/debit card handy in case if you wish to pay by card.The hospital will provide you with a ‘Medical Information Sheet’ for each applicant, which is required to be uploaded in the PR application. Do not forget to ask the hospital about this, as it is a mandatory document. The hospital may provide you with test results copy - upload that too. The hospital might not provide you documents to you on the same day of examination. They will mail you in 2–3 days.Step 10:Start filling out the forms of the PR application. Once you fill out all the forms, click ‘Next’. this will take you to a page where you will find tabs to upload documents for each applicant in your profile.If you have multiple documents (e.g.: Reference Letters from different companies), merge them in a single PDF and upload. If required, create a ‘Table of Contents’ at the first page and include ‘Page Separators’. This is highly recommended, as you would not want to confuse the Case Officer.Upload all your documents in corresponding tabs. Check multiple times whether you have uploaded the right document or not. Furnishing incorrect document may result in delay or sometimes rejection.You will get an additional tab for uploading the ‘Letter of Explanation’. This is a letter where you can clarify about any document if required. For instance, if there is a gap in your employment, explain it in this letter with justification. Keep this letter very short and use concise language.Step 11:Once you have uploaded all the documents, press the ‘Continue’ button, where you will be guided to the Fees Payment Page. Agree to the terms and conditions and click ‘Transmit and Pay’. Enter your credit or debit card details and that’s it - Your application is submitted.Following are the fees to be paid to transmit your application;Permanent Resident Application Fees - 550 CAD (for each adult in the application)Right of Permanent Residence Fee (RPRF) - 490 CAD (for each adult in the application)Permanent Resident Application Fees for Child - 150 CAD (per child)Step 12:Sit back and relax. Do not think much about ‘When I will receive the PR?’ It may take 1 month or may take 6 months for receiving PR depending upon the case. However, login to your EE profile frequently to know at what stage are you in.There are certain stages involved after submitting the application and paying the fees, such as ;eAOR - electronic Acknowledgement of ReceiptMEP - Medicals PassedBG IP(1) - Background Check in Progress for the first timeBG NA - Background Check Not ApplicableBG IP(2) - Background Check in Progress for the second timePPR - Passport Request email - Ready for VisaOnce the PPR e-mail is received, you will be requested to send the passport to the nearest VFS. The passport will be stamped and a COPR letter will be provided confirming that you are a Permanent Resident of Canada.Voila! You are ready to fly to your dream country.Elaborated Step 2 :CLB 7 is required to be eligible for Express Entry; however, CLB 7 does not give you enough points to qualify for the invitation. For CRS 440 and above, one needs to have at least CLB 9, i.e. 8777 (Listening, Reading, Writing, Speaking) in IELTS General Training or 9 each in CELPIP-G. This will boost the CRS by 50 to 60 points.Important Note:I personally followed all the above steps to apply for Canada PR via Express Entry Programme (FSW) and did not contact any consultant. Majority of the consultants will charge hefty fees for this process and on top of it, they may commit a mistake while filing your application on your behalf. I strongly encourage you to apply by yourself.If your case is complicated and you need expert advice, contact only ICCRC or CRCIC approved consultants. You can find them over here https://iccrc-crcic.ca/If you want to increase your chances of getting ITA early, get CLB 9 or above in IELTS or above 9 each in CELPIP-G. This is the key to your high CRS. Higher the CRS, better the chances to be invited early. The second best option is PNP, which will give you 600 additional points.I wish you all the best for Canada PR Application.-Gaurang
-
How many years of work experience is required for an engineer to apply for a PR in Canada? How many times can you leave Canada during this period and for how many months without affecting your PR visa status?
To apply for a PR in Canada, this is the only tool that can guide you officially!:Comprehensive Ranking System (CRS) tool: skilled immigrants (Express Entry)if you need help on understanding the tool you can always send a DM here.Also about absence:To maintain your status as a permanent resident, you must live in Canada for at least two years within a five-year period. During this time you must be here physically.The two years may not need to be continuous. An officer can confirm if your time in Canada counts when you:re-enter Canada, orapply for a permanent resident card.Time spent outside Canada may also count towards the two years if you are:travelling with your spouse or partner who is a Canadian citizen,a dependent child travelling with his or her father or mother who is a Canadian citizen,an employee of (or under contract to) a Canadian business.It may also count if you are:travelling with your spouse or partner who is a permanent resident and works full-time for:a Canadian business, orthe public service of Canada or a province,a child travelling with his or her father or mother who is a permanent resident and who works full-time for:a Canadian business, orthe public service of Canada or a province.an employee of (or under contract to) the public service of Canada or a province and you are on a full-time assignment to:a position outside Canada,a partner business outside Canada, ora client of the Canadian business or the public service outside Canada.The travel journal is an easy way to record your time outside Canada. It can help you fill out the permanent resident application form.
-
How can h1b visa holder can get green card and time line?
The typical scenario for obtaining a green card from an H1B status involves a series of steps. It’s not really easy to pinpoint an exact timeline, but if you follow the steps then you’ll certainly simplify the process for yourself and ensure that your application is completed correctly.Keep in mind, only a sponsoring employer can apply for a green card on your behalf. As an employee, you will usually fall under the EB1, EB2, or EB3 categories. You should know which category you are in so that you can better understand which steps pertain to you.Step 1: PERM Labor CertificationIf you are an EB2 or EB3 employee then this is the first step in the process. The PERM labor certification includes prevailing wage determination, recruitment, and ETA From 9089.Step 2: Form I-40Once you have filed the ETA and that has been approved, then you must file the Form I-40. This form basically indicates that you are eligible for employment and that your employer has necessary funds and assets to pay necessary wages.Step 3: Form I-485This is the final form that the employer must fill out and is the process for filing for permanent residency and is referred to as the Adjustment of Status.Each step in the process is incredibly important. To ensure that your green card is processed as quickly as possible, it would be best to consult an immigration attorney.LawTrades would be happy to connect you with a skilled and affordable immigration attorney. We work with a variety of clients whose needs range considerably. Allow our attorneys to counsel you on the best options for your situation. We offer set rates and flexible scheduling to accommodate your needs. Feel free to take a look at our website to learn more.
-
Green Card: What is it like to win the diversity visa lottery?
Anticlimactic but wonderfulI've dreamed of living in the US since my early teens. I was always fascinated by America, and even though I started learning English at the relatively late age of 12, I obsessively worked to be able to speak English with a perfect American accent, and have been largely, though not completely, successful. A few years ago, I bought a large American flag and hung it in my room. Today it still hangs prominently in my apartment.In 2012 I had the opportunity to live in the US for the first time by getting an internship at Quora! (I describe how that happened in my answer to Quora Recruitment Stories: How was Adrien Lucas Ecoffet recruited to Quora?). Realizing that I could get a job in the US if I wanted to is what prompted me to enter the DV lottery for the first, and it turns out the last, time.On October 7th, 2012, I submitted my application to the green card lottery. I remember filling the online form was quite tedious, but the whole time I was remembering that basic fact: this lottery can, no, will make me finally achieve my dream of spending the rest of my life in the US. I knew my chances of winning were pretty high: about 2%. A 2% chance of achieving one of my greatest dreams... Filling out that online form was easily the most productive 30 minutes of my life.Then there was the wait... From October to May 1st 2013, that was a full 7 months between my application and the lottery results. You'd think I would forget, and in a sense, I did, because I didn't think of it that often. Whenever I thought of it, however, I was absolutely convinced that I would win, because I felt like I so deserved to. I can be delusional like that. I don't know if it's a good thing that my bubble was never burst.On May 1st however, checking my status was the very first thing I did upon waking up. And...Wait... Have I won? What do you mean selection does not guarantee I will receive a visa? Where is all the blinking text? The "CONGRATULATIONS" in rainbow letters? Is all that legalese a way of letting me down easy? But then why does it say I was "selected"?I actually had to Google for the message people who lose get so as to confirm that I had indeed won. Of course it seemed like I had from the text, but it just didn't seem like something that important could be expressed in such a boring way. This reminded me of when I was approved for my very first US visa: I expected balloons and confettis to fall from the ceiling, but all I got was "you're all set, goodbye."And then finally... The wait again.You see, as the letter says, selection does not guarantee a green card. In fact, the department of state selects 125,000 winners for only... 50,000 green cards to distribute.The reason is very simple: more than half of the winners never actually complete their paperwork, sometimes because they turn out not to be eligible, or because they actually cannot afford to go live in the US, or maybe simply because they make a silly mistake along the way.To deal with this, every winner is assigned a waiting list number, mine is 2014EU00029XXX, which is pretty high (in fact, if everyone successfully completed their paperwork I would not get a green card).Every month, the department of state increases the maximum waiting list number needed to actually finalize the paperwork and get a green card. Based on the current trends, my number will be called in May 2014, more than one and a half years since I entered the lottery.Fortunately for me, I recently started working for Quora again. Like all of the several international Quora employees I am getting appropriate legal help with my immigration situation, which is a privilege only a tiny minority of my fellow DV lottery winners have.Because of this, I am very confident I will receive my green card. I am also applying for a work visa as a backup in case something goes wrong. A lot of extra paperwork, but it never hurts to be safe...Update: Ironically my work visa application also involved a lottery... which I lost! Fortunately everything went great with the green card, and I have been living in the US as a permanent resident for almost a year now.Winning the DV lottery is a very complex and confusing experience, but it is also one of the most wonderful things that can happen to a person. A green card generally takes years to obtain and has a tremendous value that isn't measured in dollars, but in freedom.Last time I checked, the chances of winning were of about 1 in 50 with some variations across regions.If you are an immigrant or a potential immigrant, 1 in 50 chance of getting a green card is an opportunity you cannot miss, and you should enter the DV lottery.If you are a company hiring international employees, or if you are an immigration law firm, 1 in 50 of your immigration cases can be dramatically simplified by just telling your employees to enter the lottery.I cannot recommend it enough.
Create this form in 5 minutes!
How to create an eSignature for the
How to generate an eSignature for the in the online mode
How to create an eSignature for the in Google Chrome
How to make an electronic signature for signing the in Gmail
How to generate an eSignature for the right from your smartphone
How to create an eSignature for the on iOS
How to make an electronic signature for the on Android OS
People also ask
-
What is the Imm 5444 form and how does airSlate SignNow assist with it?
The Imm 5444 form is a critical document required for certain immigration processes. With airSlate SignNow, you can easily fill out, sign, and send the Imm 5444 form securely and efficiently. Our platform streamlines the document management process, ensuring you stay compliant and organized.
-
How much does airSlate SignNow cost for managing Imm 5444 documents?
airSlate SignNow offers competitive pricing plans that cater to businesses of all sizes. Depending on your needs, you can choose a plan that allows unlimited document signing and management, including the Imm 5444 form, at an affordable rate. We also provide a free trial so you can explore our features before committing.
-
What features does airSlate SignNow provide for Imm 5444 document signing?
airSlate SignNow includes powerful features such as customizable templates, secure eSigning, and real-time tracking for your Imm 5444 documents. These features enhance your workflow, making it easier to manage and monitor the signing process from start to finish.
-
Can I integrate airSlate SignNow with other applications for my Imm 5444 processes?
Yes, airSlate SignNow offers seamless integrations with various applications, including cloud storage services and CRM systems. This allows you to streamline your Imm 5444 document workflow by connecting your existing tools and enhancing productivity.
-
Is airSlate SignNow secure for handling sensitive Imm 5444 information?
Absolutely! airSlate SignNow prioritizes security and compliance, employing advanced encryption methods to protect your Imm 5444 documents. Our platform ensures that your sensitive information remains confidential and safe throughout the signing process.
-
Can I use airSlate SignNow on mobile devices for Imm 5444 signing?
Yes, airSlate SignNow is fully optimized for mobile use, allowing you to sign and manage your Imm 5444 documents on the go. Whether you are using a smartphone or tablet, you can access all the features of our platform conveniently from anywhere.
-
What are the benefits of using airSlate SignNow for Imm 5444 document management?
Using airSlate SignNow for your Imm 5444 document management offers numerous benefits, including time savings, improved efficiency, and enhanced compliance. Our user-friendly interface simplifies the signing process, making it easier for you to focus on your core tasks while ensuring all documents are handled appropriately.
Get more for Imm 5444
- In the sellers possession and notify the buyer of any known lead based paint hazards form
- Name and address of assignor form
- Sample letter request funding form
- Warning to owner floridas construction lien law chapter 713 form
- Form 2 motor vehicle repairers register
- Lps walking field trip permission form loveland city schools lovelandschools
- Scandlines freight form
- Iu tax saver benefit tsb plan claim form
Find out other Imm 5444
- How To Electronic signature Indiana Sports RFP
- How Can I Electronic signature Indiana Sports RFP
- Electronic signature South Dakota Real Estate Quitclaim Deed Now
- Electronic signature South Dakota Real Estate Quitclaim Deed Safe
- Electronic signature Indiana Sports Forbearance Agreement Myself
- Help Me With Electronic signature Nevada Police Living Will
- Electronic signature Real Estate Document Utah Safe
- Electronic signature Oregon Police Living Will Now
- Electronic signature Pennsylvania Police Executive Summary Template Free
- Electronic signature Pennsylvania Police Forbearance Agreement Fast
- How Do I Electronic signature Pennsylvania Police Forbearance Agreement
- How Can I Electronic signature Pennsylvania Police Forbearance Agreement
- Electronic signature Washington Real Estate Purchase Order Template Mobile
- Electronic signature West Virginia Real Estate Last Will And Testament Online
- Electronic signature Texas Police Lease Termination Letter Safe
- How To Electronic signature Texas Police Stock Certificate
- How Can I Electronic signature West Virginia Police Letter Of Intent
- How Do I Electronic signature Washington Police Promissory Note Template
- Electronic signature Wisconsin Police Permission Slip Free
- Electronic signature Minnesota Sports Limited Power Of Attorney Fast